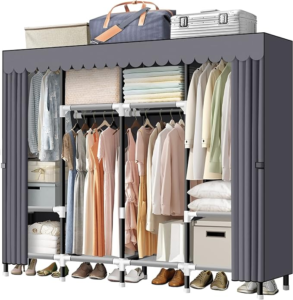
Achieving a seamless portable wardrobe assembly is easily within reach with the proper guidance. In this comprehensive step-by-step guide, I’ll lead you through the process of effortlessly putting together your portable wardrobe. Regardless of whether you’re a seasoned DIY enthusiast or a novice, these instructions are tailored to ensure a smooth and hassle-free assembly experience.
Why this matters: Having a portable wardrobe offers flexibility and convenience, ensuring your clothes stay organized in any space.


Wondering how to assemble your portable wardrobe? Let’s dive in.
Step 1: Understanding Your Portable Wardrobe Kit
Before you start, familiarize yourself with the contents of your portable wardrobe kit. Ensure all parts are present and accounted for.
List of Items:
1. Frame Components:Identify the vertical and horizontal frame pieces.
2. Fabric Panels:Recognize the panels that form the body of your wardrobe.
3. Connectors:These pieces link the frame, providing stability.
4. Zipper or Fastening Mechanism: Check for the part that secures the fabric panels.
Step 2: Step-by-Step Assembly
2.1 Frame Setup
Your portable wardrobe assembly begins with the frame:
1. Connect Vertical Poles: Insert the shorter poles into the designated holes on the longer vertical poles.
2. Connect Horizontal Poles: Attach the horizontal poles to create the frame structure.
Pro Tip:Ensure all connectors are securely fastened for stability.
2.2 Attaching Fabric Panels
The fabric panels form the body of your wardrobe:
3. Attach the Panels: Slide the fabric panels into the designated slots on the frame.
4. Secure the Fastening Mechanism: Use the zipper or other fastening mechanism to secure the panels.
Pro Tip: Pull the fabric taut for a neat appearance.
2.3 Adding Shelves (if applicable)
Some portable wardrobes come with shelves for added storage:
5. Insert Shelf Poles: If your wardrobe includes shelves, insert the poles into the frame.
6. Place Shelves: Position the shelves on the inserted poles.
Pro Tip:Follow the manufacturer’s guidelines for shelf placement.
2.4 Final Adjustments
Ensure your portable wardrobe is ready for use:
7. Stabilize the Structure: Double-check all connections to ensure stability.
8. Adjust as Needed: If any part seems loose, adjust and tighten as necessary.
By following these step-by-step instructions, you’ve created an organized and versatile storage space for your clothes. Enjoy the benefits of your newly assembled portable wardrobe!


